Showing posts with label MS Project Server. Show all posts

Monday, 1 May 2017

How to change List and Document Library Web URL in SharePoint

Today I am going to write about “How to change List and Document Library Web URL in SharePoint
”, This is an important task which admin use to do.
Description: we have a requirement to change List or Doc library web URL, if we will try to change from the user interface, it won’t allow us to do the same. We can change List or Library name, it means we can rename the List or Library Name but it won’t effect for Web URL of the same List.
We can change List or Library Web URL using SharePoint Designer and use PowerShell. In case we have don’t have installed SPD in our local system, in that case, we can use PowerShell which will be default Available.
We are going to show how to Change the URL of a SharePoint list or library using PowerShell:
  • Default If we will open any List or Library it will be appended with List or Library name and be ending with aspx which is the extension.
  • We are creating new List and will perform PowerShell script to change Web URL in easy steps.
  • Create New List and you can see the List we URL will be List Name default, refer below screen shot:


  • If we will try to change the Same List URL using User interface, we could not find any option to do the same.
  • So now Open SharePoint Management Shell with Admin rights and update the below script as mentioned:
  •   In case if you are not using PowerShell management shell, then use the first line of code about Add-PSSnapin.
  • Very first Line of the script we will variable to store the Site or Subsite URL, in case if you are using Site Collection, use Get-SPSite instead of Get-SpWeb.
  • Then List name which you want to change the URL, once all done move to next line of code and enter the URL name which you preffer to change next to List/
Add-PSSnapin Microsoft.SharePOint.Powershell
$List = $List = $Web.Lists["Test for URL Changes"]
$List.RootFolder.MoveTo("/sites/ admin/search/Test_team/Lists/test")

Note: Make sure any white space should not take place.


  • Now we are ready with the script, we will execute the same Code to PowerShell, check the List URL.
  • After executing this script we can see the result, List web URL will get change, page view will not change only List Web URL will get change, refer below screen Shot:


Sunday, 19 February 2017

Basic of Project server Online and Project Professional 2013 & 2016

Basic of Project server Online and Project Professional 2013 & 2016
Today, I am writing about Basic of Project server Online and Project Professional 2013 & 2016.
In this article I am going to describe you about below points:
  • Project Online Home page
  • Create New PWA (Project web Access) account in Project pro
  • How to open a project from project site using Project pro
  • How to edit and publish the project using project pro.
Let’s start from each of points:
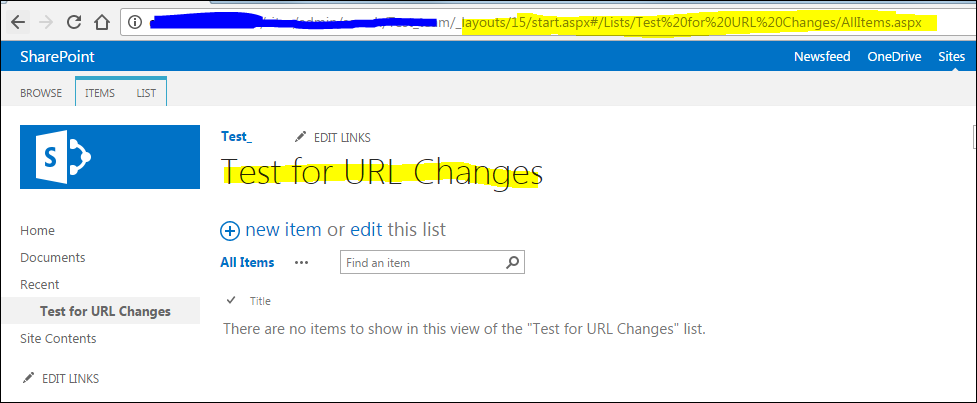
Project Online Home page: Project online home page is nothing but PWA site default page, it may be you’re customize page or default page.
  • We are going to demonstrate about how to open PWA site in Project online server
  • You should be PWA site URL, Login id and password
  • Open the same URL using any of browser, it will prompt us for enter user account and password
  • It will open default page of PWA site, see below screen shot for PWA site, we can see left side Project logo icon showing as Project.

Create New PWA (Project web Access) account in Project pro

Below are the steps to create Project server account on Project pro:
  • Open Project Pro server account, it will Project Web account and click on add from down side option, see below screen shot:
  • Once Project web accounts, is opened by default Computer account will be added, so add new account click on add now on the account properties enter the Account name, Project server URL (where your PWA site Url should be copied) down side we will getting option called set as default account means if you are opening Project pro page by default it will open with this given account only.
  • Once all done, click on ok and add the same to project pro, now open Project prop it will ask us to add the user account and password to the same.
  • Here enter your user name and click on next
  • It will take some time while searching the account and it will prompt us to ask for account type and etner the password to the next page.
  • Select keep me signed in, so next time it won’t ask for password. Automatically it will login to the account using project Pro.
  • Now we have done with creating user account and logged in created account in project pro with your PWA site where your all project are deployed.
  • Let’s start how to open project in pro first time, here I will showing all steps how to open your project in office and publish the same after updating.
See below screen shots, when we are opening any project from project server online using Project Pro
  • As I have mentioned above, how to create Project server account in Project pro.

How to open a project from project site using Project pro

  • Open Project in Professional, there is two way to open Project in professional from Project online or Project on-premises.
  • Login to PWA site and click on projects option from the left side of page, see below screen shot:
  • Click on indicator from the Project center page, it will get open in Project pro (make sure Project Pro) you have installed on your local system.
  • If going to open first time, here we need to add user account and password to project pro and click on ok.
  • Another way is there to create project account to project pro application.
  • Open Project server account from your system and add you PWA site account on the same.

  • Now open the Project pro and we need to open first Project, click on open and select pwa, below option will be available:
Project Web App> Project site URL (it will consist of PWA URL)
Click on Browse, here we can new wizard here in directory path of Project online
Next to page, on the dialog box we will get option show me the list of all Projects
Click on the same it will open with all project (this option will be available), it will be show all project here.
Select any one project here and click on open.
It will open a project in professional and we can task, project details options are available over there.
By default, project will be checked in, so before starting we need to checked-out to start updating. See below screen shot:


How to edit and publish the project using project pro.
  • Let’s start with project using project pro, once we have checked out the project we can edit the project as per custumer requirement and publish the same.
  • Just for example: we need to add some filed and update the same, highlighted one I need to update, just add new columns and add the field over there.
  • Once all done we can save or can publish this project, if we are saving it won’t effect on project online site, if we are publishing it will take effect to your site. See below screen shot:

  • After clicking on publish it will take us back to project professional page here we can see or monitor the project publishing status showing will be down at the page.
  • Once sync will get over,we will be getting option to publish project dialog box, here it will be asking to create new project site or want to publish directly in case if you don’t want to create site.
  • Click on publish button and wait till project is getting publishing.
  • See below the project publishing status, also one it will done will be showing your publish successfully.

  • To verify the project is published go back to project site online and click in project center page and filter with last project date.


Thursday, 16 February 2017

Manage Tasks List in SharePoint Online

A SharePoint Tasks list displays a collections of task that are the part Project. A tasks is discrete work item that a single person assigned.
In this article, you will learn about the following:
  • Create Tasks List
  • Creating new Task
  • Creating sub tasks
  • Delete Task or subtask
  • Adding Tasks to Timeline and removing from timeline
  • Indent and Outdent
  • Task Views and Columns
So let’s start one by and we will show the demo also for each points.
Create Task List on SharePoint Site: we have few of steps to create task List in SharePoint online and the same steps will be applied for other SharePoint online version as well.
  • To create task List in SharePoint online, Login to the site and navigate your page to site contents, click on gear box on the top of page and select site contents or click on quick launch site contents.
  • On the site contents page, select New drop down box and click on App
  • From the App page, search for Tasks and click on tasks app file.
  • Once clicked on tasks, it will appear to assign the name, enter name and click on create. Now Tasks list is created successfully and appeared on the site contents page as well.
Creating new Task: We will show the demo for how to create New Tasks under the tasks list in SharePoint online.
We have few of steps to create new tasks under the Tasks List.
  • Open the Created tasks List and click on add new tasks from the page or select items and click on new tasks.
  • After clicking on New tasks, it will appear create task wizard, here we need to enter Tasks Name, Start date, End date, Assigned to from here we can save and create new tasks, in case you want to create tasks with advanced mode we need click on show more
  • Once click on show more we will get some more box to enter information called % completed, Description, predecessors (In case u have created more items) or default it will be none, next to option called priority we can set priority, task status we can configure task status here only. And click on save.
Creating Subtasks under the tasks List in SharePoint Online:
  • We can create sub tasks in case we have existing new tasks, we can’t create directly new sub tasks. To create subtasks under the tasks List.
  • Click on eciplips (click on “…” the preview pane)of created tasks and wait once property pop will appear.
  • On the pop up we can see, there will be on option called create Subtasks will be showing there, see below screen shot for more details:
  • Click on the create subtask and add task which you want to add here. We can add some more columns by clicking on + button shown below, fill the field and click on stop button to stop this task. Subtask will be indent to next of upper or main tasks.

  • Same way you can add multiple sub task for main tasks in the SharePoint tasks list.
Deleting Tasks or Subtask from SharePoint online tasks List
Its common task for every one like adding and deleting any of items or object from where we are creating.
Here I will be showing how to delete tasks or subtask under the task List in SharePoint online, we need to follow few of steps to complete this tasks.
  • Open tasks List and select tasks or subtask which you want to delete.
  • We can delete in two ways, like select tasks or subtask and click on items ribbon page and click on delete
  • Another way is select tasks, click on eclipse and another eclipse and select delete items from here see below screen shot includes both of way to delete tasks. It will ask permission before deleting and it will move to recycle bin so later you recover from the recycle bin also.
Note: If you have created subtasks under task and deleting task will delete subtasks as well.

Adding Tasks to Timeline and removing from timeline
  • When we create a task click on “…” to open task preview window. Here we can select “Add to Timeline” to add the task to the above timeline.
  • Once timeline will get added the page will look like below screen shot:
  • We can remove it same way with “Remove from timeline”. Just select the item in preview pane and click on remove from timeline:
  • We can add or remove the timeline from task ribbon page as well.
Note: We can add multiple tasks in the time line and can remove also.
Indent & Outdent the tasks in SharePoint Online:
  • We can indent task in easy way, like we have created some of subtask under the main task now I want to indent and show similar to the main task.
  • Select task, click on tasks ribbon page, we can outdent and indent also can move up and move down the task from here, see below screen shot:
  • We can add new task from the task Ribbon page, just select Insert it will add new columns u can enter the name of task and all field can update here.
Task Views and Columns:
Task views and column are also same as other list in the SharePoint online, there will some new columns and view will be added here by default.
  • Open task List created on SharePoint List and go to the List setting page and see under the Columns section there will some new columns added from default of Any List or Library
  • In the View Section we can see many default view has been created:
  • So we can add new columns here as well modified as per our requirement
  • The same way we can add view and can modify also existing view.
  • Go back to task List page and can change view from available option on SharePoint from List ribbon page or eclipse button. See below

Thanks 

Tuesday, 14 February 2017

How to export a list from SharePoint online or on-premises

Today I am writing about “How to export a list from SharePoint online or on-premises” So Exporting a SharePoint list to our computer might which we don’t do daily but it’s good practice to do for those list which are very important. Just for example we have few of List which we need to Migrate from one SharePoint site to other instead of using any other tool we can use this by exporting and importing the same to other site.  As we know using the list export feature is a very simple and easy way to manually get all of the content in your lists and move it.
Also certain columns “Created”, “Created by”, “Modified”, and “Modified by” will not retain previous information, it will be updated automatically once the list is moved as this columns are default for the list.
So today I am showing step by step how to export a lust from SharePoint online or on-premises with screen shots:
  • So login to SharePoint site and open any one of List you would like
  • Now at the top of the page click LIST, to enlarge the ribbon.
  • Once we will click on List, In the Connect & Export section click Export to Excel.

  • From the yellow bar at the bottom click Open or save to your local system this will be for IE, I am working with MOZILA so it will be like below snap
  • If we will go to open exported list it will prompt excel security, click on enable and wait till it is getting open.

  • Now we can see the External Contacts list will open and I will see two additional columns Item Type and Path.  Don’t be confused by these as they’re just providing additional information about the items.