Monday 11 November 2019

Nintex Purge Data Deployment Plan - SharePoint Servers

In this article, you will learn about Nintex Purge Data Deployment Plan - SharePoint Servers.

How to purge items in a large Nintex Workflow History list

 
This applies to the following products: Nintex Workflow 2010, Nintex Workflow 2013.
 
If you have more than 5,000+ records in your Nintex workflow history list, you may need to review other options to purge these items as the GUI may fail its purge operation. This PowerShell script allows you to safely target and purge items from a workflow history list to keep the size down and manageable.
 

Using PowerShell to purge items

 
This script utilizes paging and indexing to specifically target each item and delete it. Paging helps throttle the traffic to your SQL server down by only deleting x number of items at a time before it resets and starts again. Indexing enables the targeting of items without the performance overhead of enumerating and/or querying a large collection of items.
 
NoteThis script will not purge or delete data using any state, this will just remove everything from given date and time.
  1. #Load Assemblies    
  2. Add-PSSnapin Microsoft.sharePoint.Powershell -erroraction SilentlyContinue    
  3. [void][System.reflection.Assembly]::LoadWithPartialName("Microsoft.SharePoint")    
  4. #Set site and list    
  5. $web = Get-SPWeb "http://your site"    
  6. $list = $web.Lists["NintexWorkflowHistory"]   
  7. #### Number of days to keep WF history (-60 = last 60 days, -180 = 6 months)    
  8. $DeleteBeforeDate = [Microsoft.SharePoint.Utilities.SPUtility]::CreateISO8601DateTimeFromSystemDateTime([DateTime]::Now.AddDays(-37))    
  9. #CAML filters (last activity date), leave this line as it is.    
  10. $caml='<Where> <Lt> <FieldRef Name="Occurred" /><Value Type="DateTime">{0}</Value> </Lt> </Where> ' -f $DeleteBeforeDate    
  11. #Setup Query    
  12. $query=new-object Microsoft.SharePoint.SPQuery    
  13. $query.ViewAttributes = "Scope='Recursive'"    
  14. #$query.RowLimit = 2000 #Uncomment to Limit the number of rows returned. (Useful on extremely large lists)    
  15. $query.Query= $CAML    
  16. $items=$list.GetItems($query)    
  17. Write-Host "Number of items about to be deleted:" $items.Count    
  18. #!!! Delete Items !!!!    
  19. $items | % { $list.GetItemById($_.Id).Delete() }    
  20. #Empty Recycle Bin    
  21. write-host "Emptying Recycle Bin..."    
  22. $web.RecycleBin.DeleteAll()    
  23. #Dispose Thread    
  24. $web.Dispose()   
NoteOn the completion of this script we need to purge the history from DBO level as well, it’s more important as the part of purring the workflow history.
 
WARNING
 
Only perform a dBO.WorkflowProgress clean up AFTER you have purged data from your Nintex workflow history lists. Not doing so will prevent you from purging items from the history list using the "PurgeHistoryListData" command unless the "-clearall" switch is used.
  • Below are the example screenshots for more details,

  • Copy the script to anyone of SP server and do the modification in site, date and List,

  • You can monitor the list data and count from SP site page and wait till this script is completing.

DBO table purge – Using Store procedure

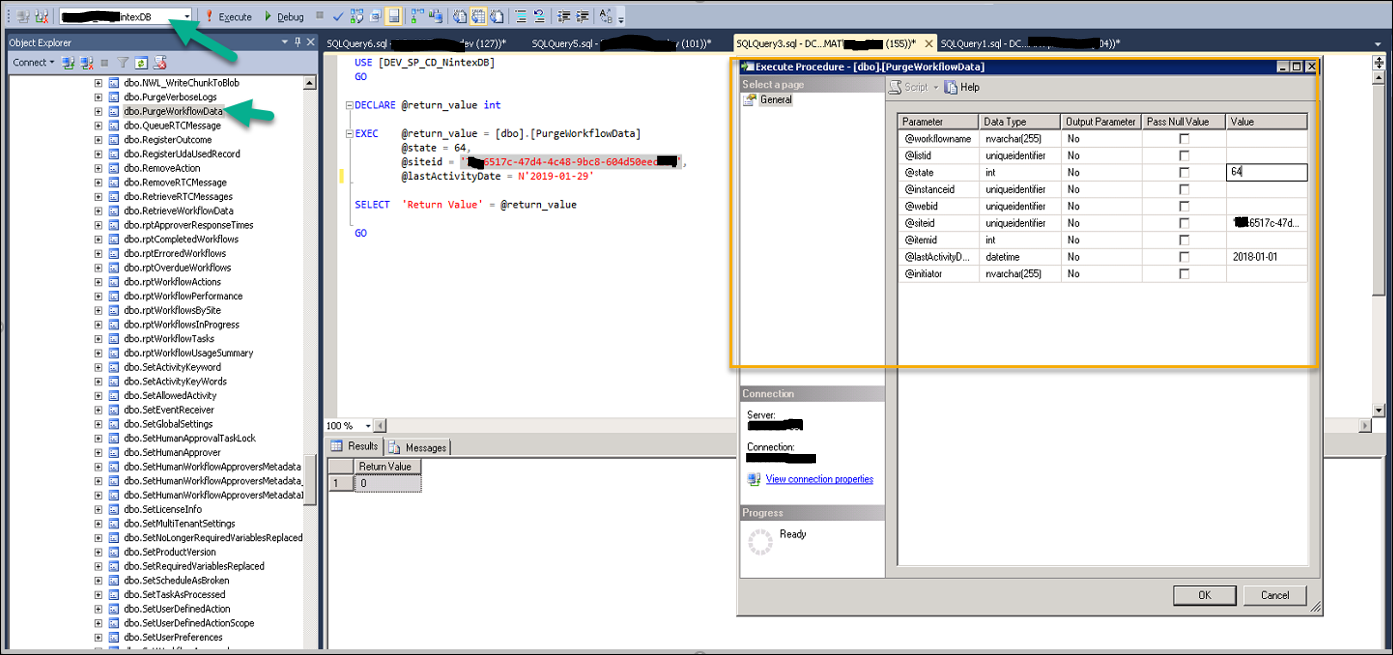
  • Open SSMS, select the DB where the Site has been associate with Nintex DB, expand the DB and select programmatic and store procedure. Refer to the below screen shot.

Before we proceed, we can identify the current data on the DB for a particular Site collection.
    1. SELECT    
    2. COUNT (case when state = 2 then 'Running' else NULL endas Running ,    
    3. COUNT (case when state = 4 then 'Completed' else NULL endas Completed,    
    4. COUNT (case when state = 8 then 'Cancelled' else NULL endAs Cancelled,    
    5. COUNT (case when state = 64 then 'Error' else NULL endas Error,   
    6. COUNT (WorkflowInstanceID) AS TotalWorkflows    
    7. FROM    
    8. dbo.WorkflowInstance    
    9. where SiteID = 'xxxx6517c-47d4-4c48-9bc8-604d50eecxxxxx'  
    Once, you have identified and made a note, we are good to go with SP to purge data from DBO table.
    • Just click on ok for the store procedure page and wait until purging is completed.
    • We can also use one or more of the parameters to fine-tune the query to limit the information that is removed.

    MS Team - Sync SharePoint Files With One Drive

    You can sync your SharePoint Online files to a folder on your computer where you can work directly in File Explorer and access the files even when you're offline. Whenever you're online, any changes that you or others make will sync automatically.
     
    Once you open MS Teams Application, you will get the teams that you have added.
     
    MS Team - Sync SharePoint Files With The OneDrive
     
    Select the Channel where the documents have been added and you want to sync in local machine.
     
    Select Channel> click on ‘Files Tab, you will be getting the document folder, this process is applicable for all the Channels.
     
    MS Team - Sync SharePoint Files With The OneDrive
     
    Select the File and select “Open in SharePoint” option available in the teams, see the below image for more details.
     
    MS Team - Sync SharePoint Files With The OneDrive
     
    It will redirect us to the browser, now click on sync button available in the Site, Click Documents or navigate to the subfolder you want to sync.
     
    Click the Sync button. (You only need to do this once in a computer to set up syncing on that computer. After you set up syncing, the files sync automatically.)
     
    If your browser requests permission to use "Microsoft OneDrive," confirm.
     
    MS Team - Sync SharePoint Files With The OneDrive
     
    Choose the folders that you want to sync, and then click Start sync, for example, I am selecting I subfolder from the files, we can clear all checkboxes from the folder and navigate to the particular folder which we want to sync.
     
    MS Team - Sync SharePoint Files With The OneDrive
     
    The files will sync to a folder on your PC that has the name of your organization (for example, %userprofile%\cvbn). This folder is automatically added to the left pane in File Explorer. You can’t select to sync to a different location.
     
    The moment it’s getting synchronized, we can track or monitor as well by clicking on the OneDrive icon from taskbar, which will show the status of file synchronization.
     
    Once it's done we can see that the folder structure will copy from parent and will sync only the selected folder which we have added for sync, also we can notice that OneDrive Icon in the taskbar will be clear once it’s synchronization is completed.

    Reusing A Deleted SharePoint Online Team Site Name

    I have deleted a SharePoint Team Site (O365), Now I am trying to create Communications Site with the same URL (name) as the SharePoint Team Site that I deleted. (For example https://sp.sharepoint.com/sites/SPadmin)
     
    Site is getting created with the appended name “2” after the site name.
     
    This article will replicate the same scenario and fix it step by step.
    • Creating a team site from the tenant, go to portal https://admin.microsoft.com/Adminportal select SharePoint from Admin center.
    • Click on active sites and create a new team site as shown in the below screenshot. Follow the steps as given below.
    Reusing A Deleted SharePoint Online Team Site Name
    • As soon as you are clicking on the Team Site template, you will be redirected to the page where you need to fill site details and click on create.
    Reusing A Deleted SharePoint Online Team Site Name
    • Clicking next will start provisioning the site, which will be ready to use in a few minutes.
    • You can check in Active site page that site will be ready to use. See below, site is ready to use
    Reusing A Deleted SharePoint Online Team Site Name
    • Now for some reason or business requirement, we need to delete this site. We will perform this deletion of this site from the Admin center or we can go to site information (gearbox, select site info and delete this site) and can delete the same. Now I am proceeding to delete this site from the admin center and recycle bin.
    Reusing A Deleted SharePoint Online Team Site Name
    • Once the site is deleted, we will create a new site selecting the same template or other template and see is it allowing us to create with the same name which we just have deleted.
    • We can see that it’s not giving the desired name before we create it, see below for more info.
    Reusing A Deleted SharePoint Online Team Site Name
    • It’s clear that the deleted site still exists on our tenant, which doesn’t allow us to create a site with the same name.
    How to resolve
    • We need to use online Powershell to fix the same.
    • Open SharePoint Online Management shell, and connect your tenant which does have SA permission
    • Once connected, Use Get-SPODeletedsite command see, below, it will result in showing you all the deleted sites.
    Reusing A Deleted SharePoint Online Team Site Name
    • We have to remove this site from here as well, to reuse the deleted site name as URL.
    • Use Remove-spodeletedsite – identity SiteURL or id see below for more details
    Reusing A Deleted SharePoint Online Team Site Name
     
    Now, we will try to create a site with the same name and see how it’s going following the same steps as we did above. Go to admin center > Active Site > create > select Template.
    • You can see that the desired name is available now and we can reuse the same.
    Reusing A Deleted SharePoint Online Team Site Name

    Send an email to distribution groups in Microsoft Flow

    In this article, I will be demonstrating how to send an email to Distribution List/Group in MS flow.
    It’s been a very common ask from end-users that can we send email from DL using MS flow. What I found sending out email using flow creating bit confusion when we talk about sending notification, email or announcing from MS flow.
    Recently, I observed that we got many requests enquiring on email set up to automate your work. As we all know MS flow is replacing SharePoint Designer gradually and it is expected from this product to work like SPD. I got a request where users wanted to send an email via Flow to all the members of a given SharePoint Security Group.
    First of all, I would like to summaries you about Office 365 groups vs distribution lists
    In simple word, we can explain the difference between Office 365 groups and distribution lists that Office 365 groups are distribution lists plus more/advance features from the distribution group.
    Distribution list: This Enables users to send emails to all members of a group with some limitation like it can not be shared, access type is not available, Document library is missing as it’s was coming from the exchange, and last but important can not be restored once deleted.
    Where in Office 365 Group, All the features of DL is available plus it has other enhanced feature while DL does not have. The most important reason to use Office 365 groups is enhancing collaboration. While distribution lists have the same purpose, Office 365 Groups go a few steps further.
    Hope, we are clear with Distribution list and Office 365 group. As we all in-migration stage from On-premises to online. Local DL allow us to convert to Office365 group without data loss or hampering end users.
    Let’s start with How to send an email to distribution list/Group in MS flow. Following below steps by steps with screenshots will achieve the same.
    · Login to MS flow and create new instant from blank.
     
    · As soon as you are selecting the above highlighted, you will get an intro page of MS flow, you can select options from given and decide the name of WF. Also, you can click on skip and change name later
    · In my case, skip the intro and selected Sharepoint on down the page, see the below images and details
             - Select SharePoint, therefore select item created or modified under action by targeting SP sites and List.
             - Once done, click on new actions and select office 365 outlook and select send an email (v2)
     
     
    · Now, it will prompt to update the required filed like to address, subject, body and other details which are available in advanced option (attachment and other references)
    · In to address, copy your DL email address, under subject field you can define what message you wanted to pass for end-users
    · Under body form, you can pass simple or advance message for end-user. There are options available under MS flow actions or can be used for simple HTML page.
     
     
    · Later making all the changes, click on the save option.
    · Now, create any one item or modified the existing item which you targeted in the SharePoint option.
    · While creating items, you can just pass the required detail and click on create.
    Note: this action needs to be done on a SharePoint list, hence kindly browse through the site for testing. Also, the flow will be an application to all the users who do have access to modify or create an item to the SPO list.
    We can see that emails are getting triggered to all the users who all are the members of the mentioned DL.
    Open the outlook for anyone users who is a member of this DL and can be verified that this action is working as expected. See below email for more details.
     
     
    In this article, we experienced about, how to send email from DL in SharePoint using MS flow. Following the same steps, we can perform for Office 365 Groups as well. No changes required.