Showing posts with label Azure. Show all posts

Wednesday, 7 December 2016

How to create Service Bus on Azure Cloud step by step with screen shots

How to create Service Bus on Azure step by step with screenshots
Today I am writing about “How to create Service Bus on Azure”. From Azure site below is use and features of service bus:
Azure Service Bus is a cloud-based messaging service providing queues and topics with publish/subscribe semantics and rich features. This fully managed service is available in multi or single tenant configurations with no servers to manage or licenses to buy.
Use Service Bus to:
  • Build reliable and elastic cloud apps with messaging.
  • Protect your application from temporary peaks.
  • Distribute messages to multiple independent backend systems.
  • Decouple your applications from each other.
  • Ordered messaging scaled out to multiple readers.
Follow the below steps to create Service Bus step by step:
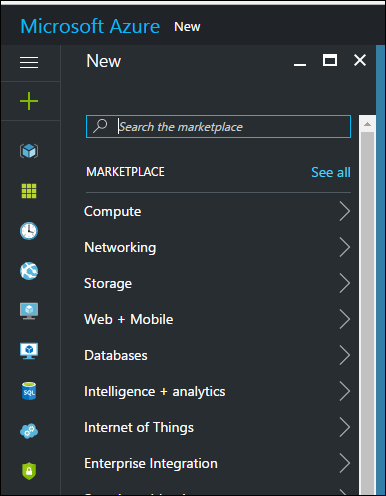
  • Login to Azure site with your credentials
  • once you are login with user account and password, it will open azure page dashboard, will be showing like below.
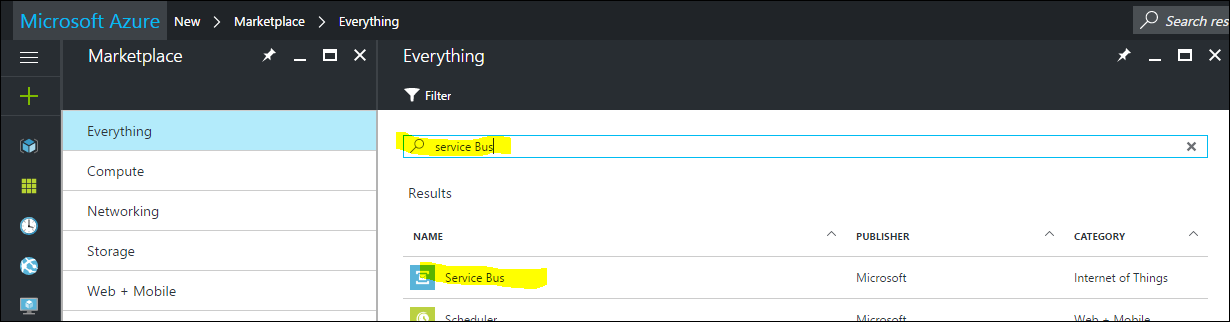
  • Here we need to select a New option from the left side of the screen and will open marketplace, here we need to search service Bus.
  • Once we will search the same, we will get service Bus option, here we need to select the same. See below screenshots.
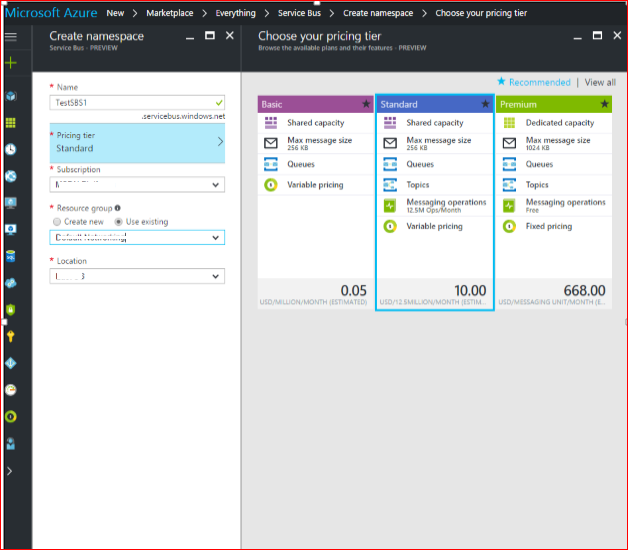
  • After selecting the same, it will open a new page about service app here we can see the details about service bus and click on Create from down of the page.
  • Once select create option from the above screen shot, it will navigate feed form, here we need to select Name of the service bus, Price Tear, subscription, Resource Group and remaining.
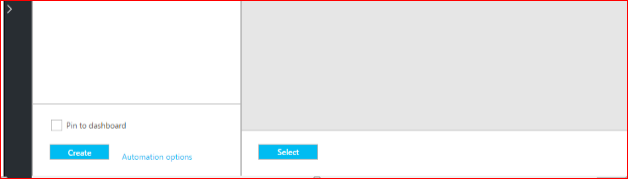
  • Once all done we will click on create, see below screenshot
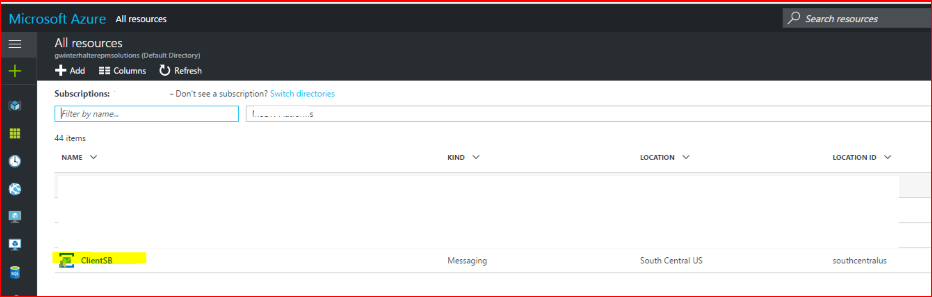
  • Now wait for some time, the service bus will be created will look like below:


Thanks ☺

How to create web App on Azure step by step with screen shots

Today I am writing about how to create web App on azure step by step, we are creating this using latest Portal view of Azure cloud.
Follow the below steps to create web App on azure:
  • Login to the https://portal.azure.com site and login with user credentials
  • You will be getting portal page will show the dashboard, here we need to select New option from the left side of the page.
  • Once select new option will move to Marketplace place, here we need to select WEB+Mobile option, once we will select the same we will get web app dashboard.
  • Here we need to select web app from the down of the page see below
  • On this page we will getting description about web app so read this to know the use and features and click on create option below

  • Here we need to assign App Name and subscription, resource Group, App service plan/location also need to select Application  insight and click on create option. See below screen shot
  • Once clicked on Create, and wait for some time and here you go your web app is created.

Here you go, First web app on azure is created and deployed successfully.
Now we can manage app services on azure only, like we can download Publish profile and use this file to Visual studio.
Thanks ☺


Tuesday, 26 July 2016

Step by Step Install Windows SQL 2016 EnterPrise on Azure Portal

Step By Step Install SQL Server 2016 on MS windows server 2012 R2
Today we are showing you about how to install SQL server 2016 Enterprise Virtual machine using Azure
We are creating with our Azure subscription, if you don't have an Azure subscription, you can create a free account  in just a couple of minutes.
  • Login to the Azure portal site using your subscription id and password
  • Once login you will be on Portal page of Azure.
  • Click on new>Virtual machines>Select server
  • Choose the VM image from the marketplace
Currently we are creating Virtual SQL 2016 server (Using windows server 2012 R2 Datacenter)
  • On the Hub menu, click New > Virtual Machines > Windows SQL 2016  Enterprise on Windows server 2012 R2
  • On the SQL server 2016 Enterprise page, under Select a deployment model, verify that Resource Manager is selected. Click Create.
Install the MS SQL server 2016 Enterprise virtual machine using MS windows 2012 R2
After you select the image, you can use Azure's default settings for most of the configuration and quickly create the virtual machine.
  • On the Basics blade, enter a Name for the virtual machine. The name must be 1-15 characters long and it cannot contain special characters.
  • Enter a User name, and a strong Password that will be used to create a local account on the VM. The local account is used to log on to and manage the VM.
The password must be between 12-123 characters long and have at least one lower case character, one upper case character, one number, and one special character.
  • Select an existing Resource group or type the name for a new one. Type an Azure datacenter Location such as West US.
  • When you are done, click OK to continue to the next section.
Screenshot that shows the settings on the Basics blade for configuring an Azure VM
  • Choose a VM size and then click Select to continue.
  • On the Settings blade, you can change the storage and networking options. For a first virtual machine, you can generally accept the default settings. If you selected a virtual machine size that supports it, you can try out Premium Storage by selecting Premium (SSD) under Disk type. When you are done making changes, click OK.
  • Specify Server settings
  1. Storage account.
  2. Network.
  3. Subnet.
  4. Public IP address.
  5. Network security group.
  6. Monitoring and Availability
  • Click OK to continue.
  • Specify SQL Server settings
  1. SQL connectivity.
  2. SQL Port
  3. Storage configuration
  4. Automate patching
  5. Automated backup
  6. Azure Key Valut integration


  • Click OK to continue.
  • Review your configuration in Summary page and click OK to deploy SQL Server 2016 on Azure VM.

  • Click Summary to review your choices. When you're done, click OK.
  • While Azure creates the virtual machine, you can track the progress under Virtual Machines in the hub menu.
  • Once click on create button, IT will start creating the server
  • It will show the deployment running status at left corner, so now wait till the completion
  • Once installation done it will completion message
  • Connect to the virtual machine and log on


Tuesday, 19 July 2016

Create a Linux virtual machine on the Azure New Portal

Today we are showing you about how to create Linux (Ubuntu) Virtual machine using Azure
We are creating with our Azure subscription, if you don't have an Azure subscription, you can create a free account  in just a couple of minutes.
  • Login to the Azure portal site using your subscription id and password
  • Once login you will be on Portal page of Azure.
  • Click on new>Virtual machines>Select server
  • Choose the VM image from the marketplace
Currently we are creating Virtual server (Ubuntu)
  • On the Hub menu, click New > Virtual Machines > Ubuntu 14.04.
  • On the Ubuntu 14.0 page, under Select a deployment model, verify that Resource Manager is selected. Click Create.
Screenshot that shows the deployment model to select for the VM

Create the Linux virtual machine

After you select the image, you can use Azure's default settings for most of the configuration and quickly create the virtual machine.
  • On the Basics blade, enter a Name for the virtual machine. The name must be 1-15 characters long and it cannot contain special characters.
  • Enter a Username, and a strong Password that will be used to create a local account on the VM. The local account is used to log on to and manage the VM.
The password must be between 12-123 characters long and have at least one lowercase character, one uppercase character, one number, and one special character.
  • Select an existing Resource group or type the name for a new one. Type an Azure datacenter Location such as West US.
  • On the Basics page, enter:
A name for the VM
A username for the Admin User
The Authentication Type set to SSH public key
Your SSH public Key as a string (by default, from your ~/.ssh/ directory)
A resource group name (to create a new deployment group) or select an existing group
And Click OK to continue and choose the VM size; it should look something like the following:
  • When you are done, click OK to continue to the next section.
  • Choose a VM size and then click Select to continue. You can view all from right side of choose size screen
  • On the Settings blade, you can change the storage and networking options.
  • Click Summary to review your choices. When you're done, click OK.
  • While Azure creates the virtual machine, you can track the progress under Virtual Machines in the hub menu.
  • Everything is fine give an ok then  monitor the same from Portal Page and from Notification button on top as below
  • It will take some time to create this VM
  • Once installation done it will completion message
  • Connect to the virtual machine and log on
  • On the Hub menu, click Virtual Machines.
  • Now here everything will  be showing on portal page,
  • To connect this machine to local system, Click on Ip address and copy the IP address
Note: Download Putty software to connect the server
Enter the IP address on the Host Name and click on Open, Once it will Open it will ask for User Id and password


Thanks, We will Keep updating more..

Monday, 18 July 2016

Connect to Azure SQL Database with SQL Server Management Studio

Below are the steps to Connect to Azure SQL Database with SQL Server Management Studio:
  • We are creating with our Azure subscription, if you don't have an Azure subscription, you can create a free account  in just a couple of minutes.
  • Login to the Azure portal site using your subscription id and password
  • Once login you will be on Portal page of Azure.
Note: first you need a SQL Database on Azure site with your subscription, If it not available follow the below my last blog about how to create SQL database on Azure:

Connecting to the Microsoft Azure portal with a subscription
  • First of all we need to install latest version of  SQL server Management Studio (SSMS) on local machine (Where you are going to connect)
  • The newest version of SSMS is optimised for both SQL Database and SQL Server 2016, and is also designed for use with older versions of SQL Server. To download and install the most recent version of SSMS, see Download SQL Server Management Studio .
Use the following steps to connect to Azure SQL Database with SSMS
  • Type "Microsoft SQL Server Management Studio" in the Windows search box, and then click the desktop app to start SSMS.
  • In the Connect to Server window, enter the following information:
Server type: The default is database engine; do not change this value.
Server name: Enter the name of the server that hosts your SQL database in the following format: <servername>.database.windows.net
Authentication type: If you are just getting started, select SQL Authentication. If you have enabled Active Directory for your SQL Database logical server, you can select either Active Directory Password Authentication or Active Directory Integrated Authentication.
User name: If you selected either SQL Authentication or Active Directory Password Authentication, enter the name of a user with access to a database on the server.
Password: If you selected either SQL Authentication or Active Directory Password Authentication, enter the password for the specified user.
  • To get above information login to Azure portal and click on created SQL Database and verified below screen shots with needing information

  • Here we will server name, login details will be same as your subscription for first time login.
  • Open SSMS 2016 then enter the login details with sever db name and Click
  • If your client's IP address does not have access to the SQL Database, you will be prompted to sign in to an Azure account and create a server-level firewall rule

  • If you are an Azure subscription administrator and need to sign in, when the sign in page appears, provide the credentials for your subscription and sign in.
  • After your sign in to Azure is successful, Click ok to configure
  • Again go back to SSMS and click on login, here we will able to connect SQL DB in local machine


Thanks