How to Configure User Profile Service Application step by step
Continue from Deleting and Creating UPA service from scratch, in the last article described how to delete and create User profile service, today demonstrating about How to configure UPA service Application steps by step with the screenshot. This articles applied for SharePoint 2010, 2013 and 2016.
Before starting configuring this service below steps need to perform as prerequisites
- Do IISreset on the server before starting our activity.
- Start User profile service and User Profile Sync service.
- To start with User profile sync service, go to CA page select System setting and click on Services on server. Here start User profile service then start User Profile Sync service, starting sync service will ask us for username and password, enter username and password and click on ok.
- Once you clicked start on this job, go back to services.msc and check forefront identity both of service will start automatically which will be disabled by default. This process is going to take some minutes maybe 10 minutes and more also so be patience.
- Go to CA page, select Service Application option from Application Management
- Select new created UPA service to configure the same.
- Here select Configure synchronization connections under Synchronization.

- Once selected the above option, it will navigate us to new connection page, Click on Create a new connection and update below information.
Connection Type Name: Name you would like to assign
Type: Under type drop down we have number of connection where we need to select Active directory
Connection Settings: Forest name, farm forest name which we can get from AD team, leave blank and select auto-discover the domain controller.
Authentication: by default, Windows authentication will be selected, enter username and password.
Port: default it will set if you want to use SSL you can check the below option.
Container: Automatic will come appears once we are clicking on populate containers.
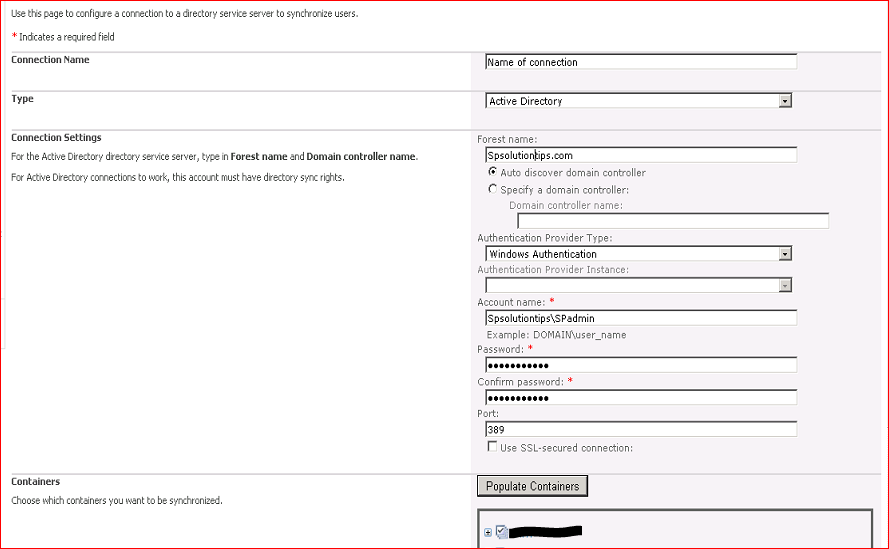
- As above image enter all the details and click in populate containers, which will bring down your AD name, select the same and click ok.
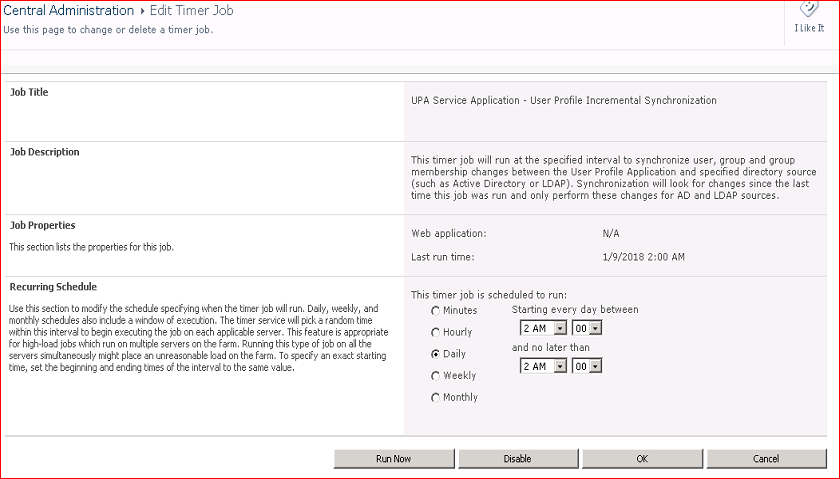
- It will take back to Connection page, go back to the UPA service application page and configure Synchronization timer job. Once clicked on the same will navigate this page to edit timer job page where we can select recurring schedule job and click on ok. See below
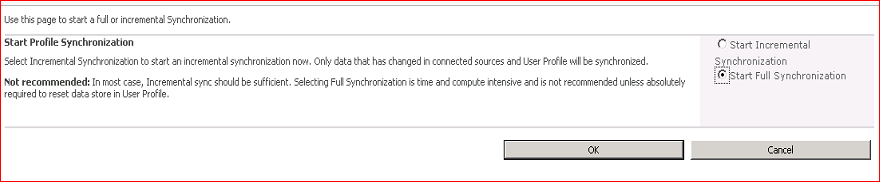
- As we have with the configuration so we can proceed with starting Profile synchronization, Click on that option from synchronization.

- As it’s for the first time we need to start full sync, select full sync and click on ok
- Go back to UPA service page, we can see monitor the same. We can monitor the same from FIM service which will be available under SharePoint installed path.
C:\Program Files\Microsoft Office Servers\14.0\Synchronization Service\UIShell
- Open miisclient.exe can monitor the sync status from here as well.

Note: If use profile service synchronization service is not started, it will throw error on opening of this application
Will continue writing about in next article about topic for User profile services, thanks
One two slim соответствует заявленным показателям, значит вес уходит без проблем и плавно. Вечер ван ту слим one-two-slim-kapli.ru Очищает фигуру и усиливает обмен веществ. Результат превзошел ожидания, ушло даже целых 6 кг. Завод позволяет побеждать проблемные зоны, фокусируя процесс расщепления липидных запасов конкретно на премиях. Кора крушины - обладает мягким слабительным действием, в отличие от других аналогов, не вызывает привыкания. Преимуществом капель являются их оригинальные параметры и сильные ингредиенты, которые активно расщепляют жиры. Прежде всего, вам следует приобрести две бутылки комплекса для утреннего и вечернего приема. Информация на портале размещена в соответствии с принципами, которые представлены на сайте "условия". Публикация, размещенная на нашей странице, остается абсолютно выражением личного мнения ее автора! Автор указан рядом с названием публикации.
ReplyDelete